
Loading...

Stretch Ceiling DIY
DIY how to make your own 3D Infinity Ceiling Stretch Ceiling 3D illusion Effect on Stretch Ceiling by elektric-junkys
DIY
how to make your own 3D Infinity Ceiling Stretch Ceiling 3D illusion Effect on
Stretch Ceiling by elektric-junkys
CHECK
OUT THE PARTLIST
In this DIY Step by Step Text Instructions we
are going to show you, how to make your own Stretch ceiling or 3D Illusion Roof
stretch Roof yourself, with an Easy Assembling Stretch roof Kit from electric-junkys.
Easy Installation, Affordable Price, Top Quality Spare parts and Service.
REQUIRED TOOLS AND MACHINES.:
Machines.:
- Fan Heater (Gas or electric)
- Heat gun
- Cordless Screwdriver ”driller”
- Circular Saw or Handsaw
Hand
Tools.:
- Several Screwdrivers (Cross, Slot)
- Bits for Battery Driller
- Stretch roof profile Spatula
- Tape Measure
- Detergent (Cleaning)
Material.:
- Stretch Roof Ceiling Fabric PVC or TEXTILE, Quality, Thickness, Colors, 3D Prints, Sizes could be chosen by Customers electric-junkys offers several different Options for Stretch ceiling installation shop.elektric-junkys.com
- Fetch profile Fixation System we offer several Fixation Systems Affordable Robust and Stable!
- Second Layer or Fixation for Lightning depend on your Wanted Lightning Area.
- Double Tape for Several Purposes
- Cable clippers
- LED System WIFI or Simple with RGB Controller and Remote for sure ! There are a Ton of Options to make an Lightning system under your Translucent Stretch Roof ..
- LED Modules, LED Strips, LED Bulbs, LED Rigid Bars. Animated LED Supplies such as WS2812b WS2801 Pixel Destiny Based and and and
- Control System “RGB Controller with IR Remote” WIFI Controller download our App and control your Ceiling light with your Samsung or iPhone
- Power system choose the Right Power Based on your LED supplies consumption
- Several other LED Integration such as LED Down lights or LED Ultra slim Panels are possible .. checkout our LED Ultraslim Panel Light installation https://www.youtube.com/watch?v=hrqFFpKkq0U&index=5&list=PL2998CFAE80A9A8A6
- Screws Self-Drilling (if you use Aluminum Profiles)
First buy, order, collect all the needed
Components for this 3D Stretch Ceiling Roof Project,
most of the accessories are
Optional,
they’re modified for our project you can
change the accessories like color of the PVC Ceiling Fabric or the Fixation
Profiles, LED Supplies waterproof or non-Waterproof of the led strip
IP65/IP68/and more, for this project we use an LED WW/CW and RGB LED System
with an Ordinary Music controller which Light up to the beat of the Music
the Kit is available on our shop.elektric-junkys.com. There is of course a
Possibility of WS2811/WS2812b or WS2801/WS2802 to control several Areas in a
Disco Bar or Club. We are using here a PVC Stretch Ceiling robust, easy installation
and Fitting, awesome look.
We offer all the accessories and assembling
parts for this project and many other LED projects (TOP PRICE TOP QUALITY incl.
WARRANTY, SHIPPING BY DHL EXPRESS 3-6 DAYS) so we will assist you for questions
and Price inquires.
WARNING = BE AWARE OF CHEAP CRAP LED CHIPSETS (low price>low
quality)
THERE ARE A LOT OF SCAMMERS ON THE MARKET HERE USE REFURBISH CHIPS SECOND HAND IC´S THIRD PARTY LOW Q. ASSEMBLY PARTS AND MORE:::
THIS WILL CAUSE A LOT OF FAILURES AND SHORTER LIFETIME > Headache
THERE ARE A LOT OF SCAMMERS ON THE MARKET HERE USE REFURBISH CHIPS SECOND HAND IC´S THIRD PARTY LOW Q. ASSEMBLY PARTS AND MORE:::
THIS WILL CAUSE A LOT OF FAILURES AND SHORTER LIFETIME > Headache
Important Note.:
BE
SAFE ! IF YOU ARE NOT SURE WHAT OR HOW TO DO CONTACT AN PROFFESSIONAL! Don´t
hurt yourself or others with actions caused by Unauthorized Machine Usage
! we take no responsibility´s for the here showen Instructions.
THIS PROJECT IS FOR ENTERTAINMENT AND ADVERTISING PURPOSES ONLY!
So Let’s
Start ….
Step.1
Make your assebly Parts and Tools ready
Be sure that
the BASE of the Roof is Stable and in the Conditions to install your Roof, be
sure that the Roof is not completely instable that later nothing can Fall on
your Stretch Ceiling.
As you can see we were adding an suspended ceiling by plasterboard
Plates, to come on our Requested Size of the Roof.. for Future orders please be
sure that you are ordering 30mm more on each side for stretch the PVC Later..
Step.2
Once
we created our Frame plasterboard Roof, we are going to ad our Aluminum
Fixations, Cut them on your needed Lengths. Drill the Screw holes in the
Profile before if you have no Self Drilling screws.
Step.3
Fix
your Alum. Profiles on the Roof construction be careful and take care that they
are Well aligned and also in Spirit Level.
Step.4
Assemble the
LED Supply, Use the Double Sided Tape on the LED Strips, peel the protection
paper from it, place the LED Strips aligned your Pre added Fixation Profile for
the LED Source.
After you
placed it take care that the Power is enough on every Side of the Roof, you may
split the Power and Input a Fresh Power Cable from your Power supply to the 4th
Meter of every Strip.
Connect all
to the controller Connect the Power and check how it Looks … If all is ok we
can go on with the Installation of the Roof …
Step.5
Unfold your
Stretch Ceiling Fabric you receive of us, we fold it in a Special Way that
there are as less as Possible Folds .. We will get them out anyway but more to
that later..
So unfold
the Fabric on a CLEAN Floor with enough Space.
Close all your Doors and Windows, Start
Your Heat Blower to Heat up the Room on about 40 degree Celsius. !
- Make sure to not forget any Tools
or other stuff on you roof..!
- Make Sure the LED System is well
secured and no Cables are hanging loose around.. !
Step.6
Squeeze in one of the 4 Sides you have over the full length
(6:44min)
Now you can
Use your Big Fan Heater to heat up the Fabric, blow on the Fabric with an
distance of at least 1.5 - 2meters based on Thickness of the Material and the
Room air Conditions NOT TOO LONG ON ONE POSSITION!!
EVELY
MOVEMENTS Heat up the ceiling until you see the Folds are disappearing and the
Fabric is soft and smooth.
WARNING DO NOT APPLY HEAT AT ONLY A CERTAIN POINT OR YOU WILL BURN
THE FABRIC AND THAT’S IT, ALL WARRANTY CLAIMS WILL BE REJECTED!
“EVENLY UP AND DOWN MOVEMENTS NEVER STAND ON A POINT !”
Step.7
Now directly
“after heat up process” grab the long sides of the Roof and start squeezing
them into your Fixation Profiles.
If your room
is not well isolated the roof will cool down faster and you have to heat it up
again ;) ! THE CEILING FABRIC NEEDS TO BE SMOOTHLY AND SOFT TO PROCESS IT !
Step.8
After it’s done
“you pull or squeeze all your Fabric into your Fixation Profiles” Open the
Doors and Windows, and the Ceiling will Immediate Shrink and Stretch itself very
fast. STRETCHING AREA ABOUT 20mm at least
Step.9
Use your
Hand Heat Gun to remove all remaining Folds..
ATTENTION AGAIN - DO NOT
APPLY TOO MUCH HEAT TO ONE PARTICULAR POINT OF THE FABRIC!!! UNIFORM MOVEMENTS!!!
Step.10 my Favorite
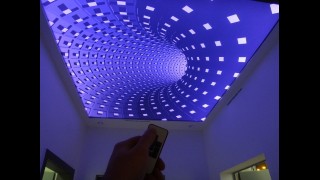
Go over to your Kitchen open the Refrigerator,
take out an Beer, go Back to the room with the New ceiling sit down on the
Floor don’t forget your LED Remote, Open the Beer Turn on the Lights with your
Remote possible with your Phone if you decide for our Wifi System and JUST
ENJOYYYY ;p
So I Say Cheers ….
Hope you enjoy the TEXT DIY & OFCOURSE
THE VIDEO INSTRUCTIONS
If so like share & Comment